


By C.W. Cameron / For the AJC
Troy Warren for CNT #HomeGarden

Our kitchens have always been one of the busiest places in the house. We cook in them, we eat in them, and last year we turned some of them into virtual offices and classrooms. With most of us spending a lot more time at home, our kitchens got a real workout. As Lisa McManus, executive editor of equipment testing and ingredient tasting at America’s Test Kitchen, said to me, “With preparing three meals a day plus snacks, we’ve all become a lot more familiar with our kitchens.”
And while the past 18 months have brought many stories about self-care focused on our physical and mental well-being, we thought it was time to talk about the care and well-being of our kitchens.
With all the time we’ve spent in our kitchens, many of us are ready for an update. Research conducted by the Association of Home Appliance Manufacturers found almost a third of us expect to upgrade our kitchen appliances or begin a home renovation in the next year.
AHAM’s Jill Notini said that one of the most interesting things they found in their research was the increased recognition of connection between staying healthy and keeping a clean home. “We know that people are ready to get back to the ‘way it was,’ but they’ve also adapted and expect to continue some of the things they’ve started, such as hosting smaller gatherings and doing more cleaning.”
McManus added, “Our instincts have kept us alive for thousands of human years. If something is grossing you out, it’s probably because you know instinctively it will make you sick. Make ‘hot and soapy’ your mantra. Use hot, soapy water to clean and you don’t need a ton of chemicals.” And she adds that a clean kitchen is not only more pleasant to be in, it’s easier to use.
Those large appliances in your kitchen like your refrigerator and oven are also your biggest investment. Nolan Swanlund of Sterling Service Group says pandemic or not, there are a few regular things his customers could be doing to keep their big appliances functioning at their best.
“The No. 1 thing you can do to take care of the biggest appliance in the kitchen is to keep the condenser on your refrigerator clean. It’s designed to pull in air to keep the unit cool. But along with air, it also pulls in dust and pet hair, and that can block the flow of air. Get out your vacuum with the brush attachment and vacuum the condenser regularly. If you let this task go, it can lead to a very expensive repair,” said Swanlund.
Some appliance parts wear out, but Swanlund says the icemaker is the item in your refrigerator most likely to actually break. That’s because it has several moving parts, including the system that brings water to the icemaker and mechanical fingers to scoop the ice after it freezes. Swanlund says the only cleaning required is generally to remove the ice bucket, discard the accumulated ice, and wash the bucket before returning it to the freezer. Other than that, just being gentle with the icemaker and making sure everything is in place when you close the freezer door is the best way to ensure a long life.
All our experts agree. Keeping on top of things is critical.
Since ovens and cooktops are the appliances that get the most abuse when cooking, all our experts recommend that the cook clean up as she or he goes. They all agree you want to keep from getting to the point where it’s impossible to remove caked-on, baked-on food.
Swanlund also adds that a little preventive maintenance is a good thing. Just like cleaning up as you go saves lots of work in removing layers of food debris, a periodic service check can make sure all the systems in your appliances are functioning properly. “A little bit of frost accumulation in the freezer, for example, might not seem like a big thing, but it could be the sign of a bigger problem. A service check can catch things before they fail so you don’t wake up one morning to find your refrigerator is now at 75 degrees.”
Notini notes, “When your appliances are clean and running at peak performance, they’re not only more pleasant and efficient to work with, but they’re maintaining their energy efficiency as well.”
And McManus says the goal is not to have kitchen tools that look shiny and perfect. “Would you trust a carpenter who showed up for work and only had brand-new tools? You’d wonder, ‘Have you ever done this before?’”

TAKING THINGS STEP BY STEP
Lisa McManus of America’s Test Kitchen likes to say that a well-kept kitchen makes it easier to produce good food. And our experts agree that a clean kitchen makes it easier to produce healthy food. Remember that bacteria isn’t visible, so don’t wait until something looks dirty to clean it.
Find your owner’s manual
Every appliance in your kitchen came with a manual. Do you still have yours, perhaps tucked away in a notebook for easy reference? If not, the good news is that almost all manuals are now available online and many come with instructional videos. Check the owner’s manual for recommendations on how to and when to clean your appliance. Now, while you’re looking for your manuals, here are some tips to keep your kitchen clean and your appliances functioning at peak performance.
What’s the difference between cleaning and sanitizing?
Cleaning is removing the soil, but sanitizing is killing the bacteria, viruses and fungi that cause illness.
What are the germiest things (in order) in your kitchen?
1. Sponges or dishrags
2. Kitchen sink
3. Pet bowl
4. Coffee maker reservoir
5. Pet toys
6. Countertops
7. Stove knobs
8. Cutting boards
Appliances like your dishwasher and clothes washer have sanitizing cycles with benchmarks established by NSF, a public health and safety organization that develops standards and certifications. Their standards for sanitizing cycles certify that properly used, the cycle will remove over 99% of the microorganisms that can make you sick. Adding items such as sponges, pet dishes or pet toys to the dishwasher when you’re running the sanitizing cycle will ensure that those items are sanitized as well as cleaned. Your dishwasher manual should have a recommendation on how often to run the sanitizing cycle, but you can run it any time you want.
To clean and sanitize
First, wash surfaces with soap and warm, clean water to remove dirt and debris. Then sanitize with a solution of 1 tablespoon household bleach to 1 gallon of water. If the item has mold on it, increase the solution to 1 cup of bleach to each gallon of water. Never mix bleach with ammonia or any other cleaner. Wear rubber gloves, and be sure to work in a well-ventilated area.
You may choose to use a sanitizing product approved by the Environmental Protection Agency. EPA also offers a list of disinfectants approved to kill COVID-19 (epa.gov/coronavirus/about-list-n-disinfectants-coronavirus-covid-19-0).
Sanitize surfaces like kitchen sinks, countertops and stove knobs regularly, and do dishes as soon as possible since bacteria begins to grow on soiled dishes after about two hours at room temperature.
Sources: Association of Home Appliance Manufacturers, NSF International, Centers for Disease Control and Prevention
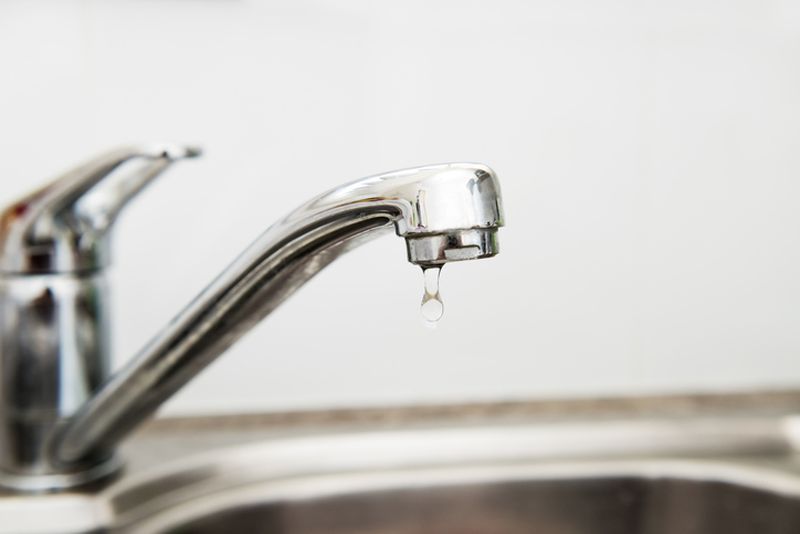
Clean your sink
• Sinks are one of the dirtiest spaces in your kitchen, and the faucet handle is a close second. Everything you do in the sink has the possibility of leaving little traces of food everywhere. Think of that colander of pasta draining in the sink. You don’t want anything in a dirty sink splashing back on that cooked pasta.
• Hot, soapy water is very effective at eliminating bacteria. For added insurance, clean the sink and faucet frequently with a solution of 1 tablespoon of bleach per quart of water. The bleach will help kill some of the bacteria in the drain as well.
Source: America’s Test Kitchen
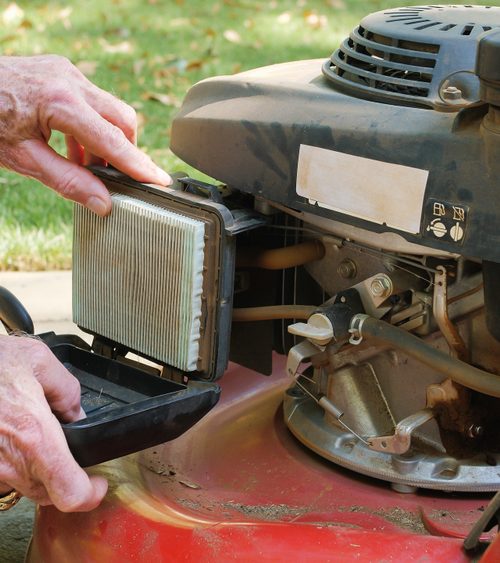
Caring for major appliances
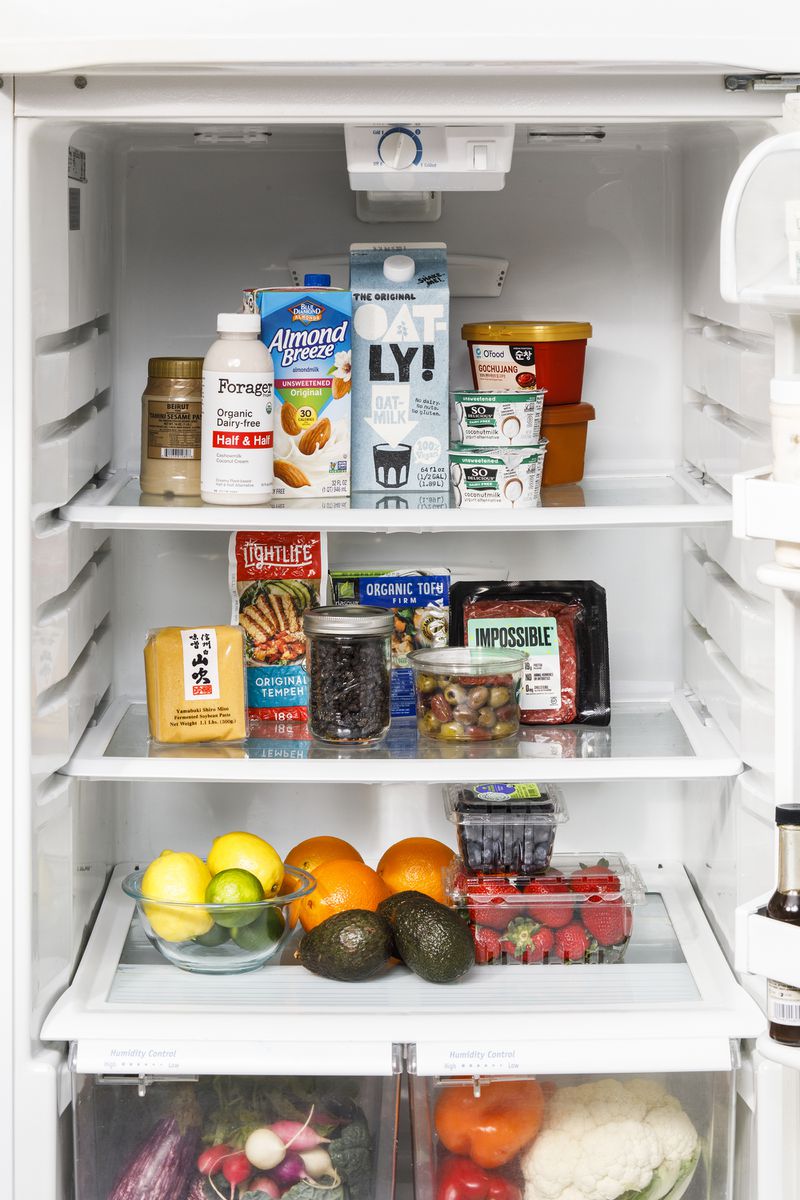
The refrigerator
• Clean the condenser every six to 12 months, more if you have pets shedding lots of fur.
• Figuring out where that condenser is may take a minute since sometimes they’re at the top of the refrigerator and sometimes they’re at the bottom. They’re generally covered with a grill and there may be a kick plate that has to be unscrewed.
• The condenser area may also have a water filter. If necessary, remove the filter before vacuuming.
• Use a soft bristle brush attachment to remove dust, pet fur and lint. A paint brush or a can of compressed air can also work, and the compressed air may reach areas you can’t get to with the vacuum.
• If you removed the water filter, replace it before covering the condenser again.
• If you have spills in the refrigerator, wipe them off as soon as they happen.
• Periodically, make time to remove everything from each refrigerator shelf. Wash the shelf, return it to the refrigerator and then sort through the items you plan to put back. Be sure to wipe those down before putting them back on the shelf.
• Don’t forget to wipe down the refrigerator gasket, even to the point of using a toothbrush to get into all the crannies. Consider a solution of 1 tablespoon baking soda to 1 quart of warm water. It’s not a good idea to use bleach as that can break down the material that makes up the gasket.
• At America’s Test Kitchen, they prefer clear glass or plastic containers so it’s easy to see what you have.
• Make it a practice to keep things circulating, so nothing gets stuck in the back.
Sources: Sterling Service Group, Association of Home Appliance Manufacturers, America’s Test Kitchen
Dishwashers
• The most important thing to do to keep your dishwasher functioning properly is to clear the filter at the bottom of the machine. It’s there to collect the food that rinses off your dishes during the washing cycle. It can become clogged with food debris, and it can also become calcified just as your coffee maker might.
• You may need to remove the bottom rack of the dishwasher to access the filter. Generally you turn them clockwise to remove, then clean and put back in, turning counterclockwise to properly seat the filter in place.
• Remove the filter at least once a month and use hot, soapy water and a toothbrush to scrub it. You can use a vinegar solution if you prefer. Letting the filter sit in a water/vinegar solution for a few hours may make it easier to clean.
• Use hot, soapy water to clean the edges of the dishwasher door and the part of the bottom of the machine that the door covers when the machine is closed. These areas can quickly become soiled with food debris as you load the dishwasher and should be cleaned weekly.
• If your dishes are not coming out clean, there could be any number of reasons. Are the spray arms able to turn freely? Are the dishes spaced far enough apart that water can get to all the surfaces and are bowls arranged so they are face down and not nested?
• Most dishwashers now recommend you do not pre-rinse because they actually need some food residue to work properly.
Sources: Sterling Service Group, Association of Home Appliance Manufacturers, America’s Test Kitchen

The oven and cooktop
• The best way to have a clean oven or cooktop is to clean it after every use.
• Wipe down surfaces with hot, soapy water and be sure to get up any food debris, especially anything that may have become cooked or baked on.
• Gas ovens and electric ovens and cooktops, as well as glass cooktops, all have different cleaning requirements. Be sure to find that owner’s manual and follow the instructions there for cleaning the appliance itself as well as removable parts such as grates and burners.
The range hood
• It’s easy to forget to clean the range hood, but it’s the place where heat and steam collect, often depositing grease on the surface.
• Range hoods usually have removable metal filters that can be run through the dishwasher. If the filters become clogged, the air flow is blocked and you can end up needing to replace the hood.
• Depending on the other surfaces of your hood, use hot, soapy water or a cleaner like Bar Keepers Friend to gently remove any grime on those other surfaces. Be sure everything is dry before you use the hood again.
Sources: Sterling Service Group, Association of Home Appliance Manufacturers
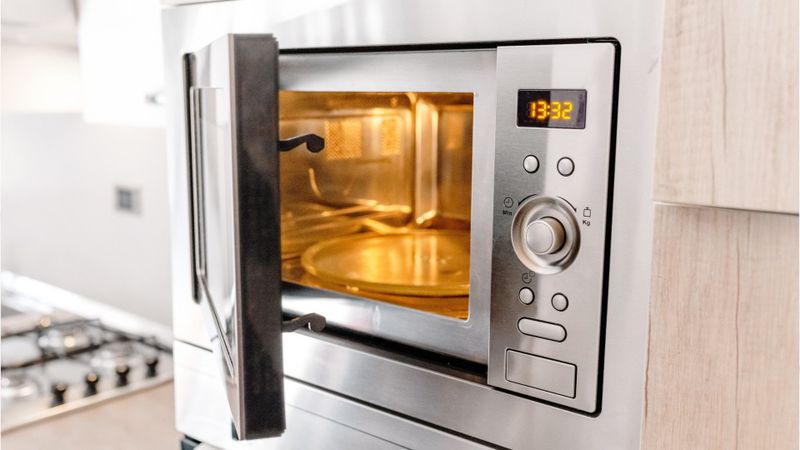
Caring for small appliances like toaster ovens, blenders and microwaves
• Keeping your small appliances clean is not only important for aesthetic reasons, but if food particles and soil build up on and in your appliances, it can degrade the wiring and other parts. That not only can shorten the life of your appliance but it may also pose a real safety hazard.
• Clean up spills and food debris after every use.
• Find your owner’s manual for the particular instructions for your appliance for the best way to remove any food particles or spills that build up inside.
• Periodically check your appliance cords to be sure they’re in good shape.
• Make sure there’s plenty of air circulation around your appliances when they’re in use so heat buildup won’t damage motors and other parts.
• If there are removable parts like a crumb tray or microwave turntable, take them out, remove food debris and wash with hot, soapy water. Don’t return them to the appliance until they are dry.
• Many blenders now come with fixed blades. The best way to clean the blender jar is to put in a little warm water and a few drops of dish soap, then run the blender until the food debris is loosened. Rinse and dry before reassembling the blender.
Sources: Association of Home Appliance Manufacturers, America’s Test Kitchen
Coffee maker
• You can invest in a beautiful new coffee maker, but if you don’t descale it regularly, it will eventually stop making delicious coffee and may break down.
• Check the owner’s manual for instructions on cleaning the unit.
• To clean and descale the water reservoir, if the instructions allow, run a full cycle using no coffee and water diluted with a little bit of vinegar, or use a descaling product, following the instructions on the package.
• Do not store ground coffee or coffee beans in the coffee reservoir as that can lead to mold.
• Be sure to let all the parts of the coffee maker dry out between uses.
Source: America’s Test Kitchen
Cleaning enameled cast-iron cookware
• The enamel is a glasslike coating that is fired onto a cast-iron Dutch oven or skillet.
• To prevent cracking the enamel, don’t put your pot through dramatic temperature changes, especially if there’s water involved.
• Don’t heat an empty pot.
• To clean a pot with burned-on residue, fill the pot halfway with tap water and bring the water to a boil, uncovered. Let it boil for two to three minutes, then turn off the burner. Scrape the pan with a wooden spatula and pour off the water. Let it sit briefly. More residue should flake off as the pan dries. Wash the pot with hot water and dishwashing liquid and let dry. Repeat if necessary.
• To remove stains from the finish, fill the pot with a mixture of 2 cups of bleach and 6 cups of water. Make more solution if needed to fill pot above the staining. Allow to sit overnight. If the pot is badly stained, it may require a longer soaking.
Source: America’s Test Kitchen

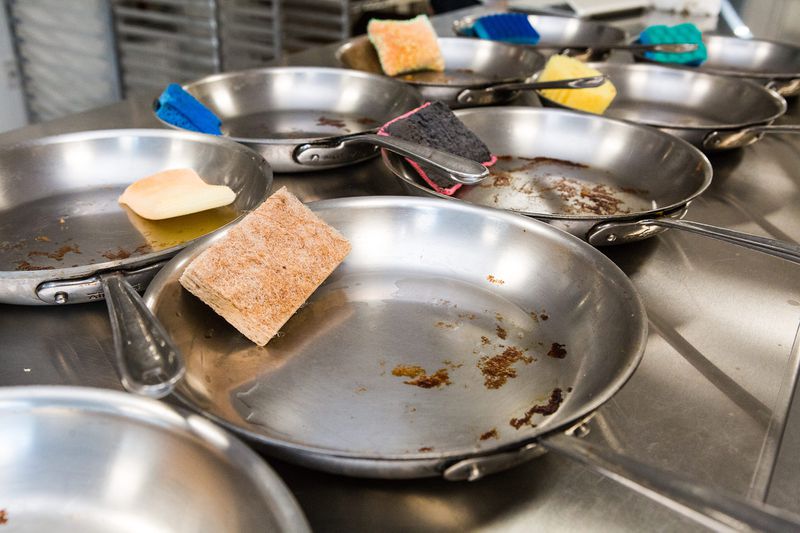
Cleaning cast-iron cookware
• Clean your cast-iron pot or skillet after every use.
• Wipe the surface of the still-warm skillet or pot with a paper towel to remove food and oil.
• Rinse warm skillet or pot under hot water. If using soap, add only a small amount and be sure to rinse well.
• Dry skillet thoroughly and heat over medium-low heat until all moisture is gone. Add 1/2 teaspoon cooking oil to the warm pan and use paper towels to lightly coat the interior surface with the oil. Continue wiping surface until it looks dark and smooth and no oil residue remains. Cool skillet or pot before storing.
Source: America’s Test Kitchen
Three ways to clean a kitchen sponge
• Dampen the sponge and microwave it for at least two minutes.
• Run the sponge through the dishwasher on a sanitizing cycle. Do this every time you run your dishwasher.
• Submerge the sponge in a solution of 3/4 cup of bleach to 1 gallon of water. Let it sit for at least five minutes, then rinse thoroughly.
However you clean your sponge, allow the sponge to dry completely before using it again, ideally in a rack that allows air to circulate around all surfaces of the sponge.
Source: America’s Test Kitchen


In Other NEWS