


Troy Warren for CNT

Whether it’s a piece of lawn furniture or PVC trim, you’re bound to paint plastic at some point. These tips and tricks will ensure the job gets done right.
Plastics are perhaps the most difficult surfaces to paint. Their chemical composition and smooth surface do not promote good paint adhesion, and the fact that plastics can expand and contract at a greater rate than many paints leaves them vulnerable to flaking paint, even when you think you have the coating securely adhered. With proper preparation and specialty products, however, you can paint plastics and not have to worry about the durability of the finish.
For interior walls (tiled with plastic tile, for example, or finished with other plastic products), apply a high-adhesion latex stain-blocking primer. For bathroom and kitchen walls not subject to constant exposure to water, use a top-of-the line-interior latex paint. Shower walls and similar surfaces do not make suitable candidates for paint.
For extra insurance against peeling and cracking, ask your paint dealer about primers and paints made specifically for plastic surfaces. They will give you a great deal of versatility in transforming drab outdoor objects into attractive ornaments.
3 Steps to Painting Plastics
There are three key steps for painting any type of plastic: prep, prime, and paint.
Prep: Get rid of any mildew by scrubbing the area with a 3:1 water and bleach solution. Keep the area wet for about 20 minutes, then rinse. Next, clean the object thoroughly with detergent and warm water. Rinse and let dry. To help the paint stick better, scuff-sand the surface with 200-grit sandpaper. Wipe off the sanding dust with a damp cloth and let dry.
Prime: If you’re painting interior plastics, apply a high-adhesion latex stain-blocking primer. For outdoor plastics, spray-prime with specialized primers formulated specifically for adhesion to plastics.
Paint: Evenly apply interior plastics with a top-quality acrylic paint and outdoor plastics with a spray paint designed for plastics.
How to Paint Plastic Lawn Furniture
Step 1: Wash and Sand
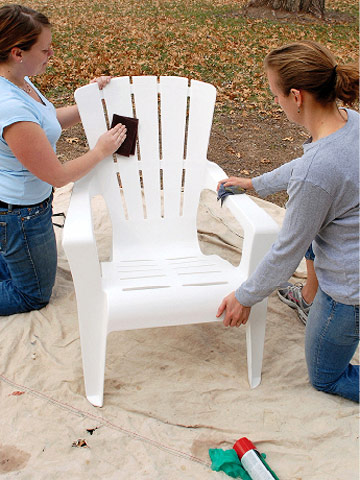
Wash the object thoroughly with a mild detergent solution and let it dry. Then lightly scuff with 200-grit sandpaper. Wipe off the dust.
Step 2: Prime and Paint

Using a spray primer and top coat formulated for plastics, prime the surface, let it dry, then paint it. Spray multiple light coats, letting them dry completely before applying each succeeding coat.
How to Paint PVC Trim
To paint PVC trim, wash, rinse, and let dry. Scuff-sand (220-grit) and wipe clean. Prime with acrylic latex primer recommended for exterior PVC surfaces and top-coat with 100-percent acrylic latex paint using a high-quality sash or trim brush. To avoid potential warping, do not paint trim darker than its original color.
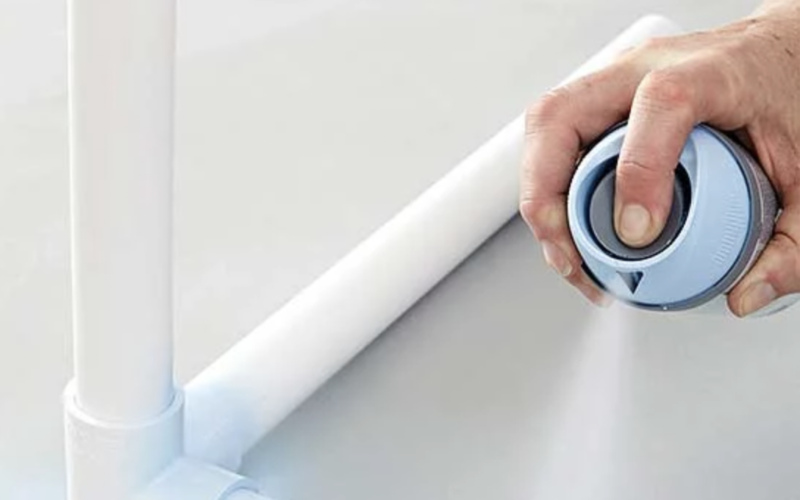
Bonus: Spray Paint Protocol
For perfect spray paint results, follow these important tips:
Test the spray on a piece of paper taped to a wall.
Hold the can as perpendicular to the surface as possible.
Tack coat the first pass for about 50-percent coverage. This gives the next coats something to adhere to.
Apply the paint in numerous light coats, not one heavy coat.
Shake the can periodically during the paint job.
Avoid “orange peel” by not applying the paint too thick or on too warm a surface. Smooth mild orange peel with fine rubbing compound. Wet-sand severe orange peel, smooth with rubbing compound, and recoat.
Prevent runs and sags by not spraying too much paint or a cold surface. Remove dried runs with 400-grit or 600-grit sandpaper and paint again.
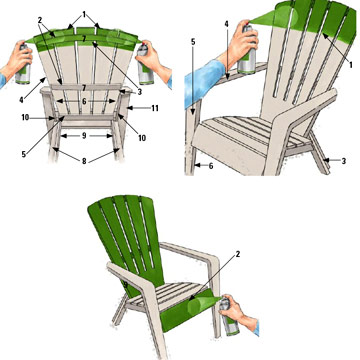
When spraying furniture, paint the bottom. Then turn the chair upright and paint in the order shown. The best way is to paint as much of the object as you can see from one side, then reverse your position and paint as much of the surface as you can see from the other side. Applying paint in this order will ensure that you get full coverage and will eliminate drips. Apply the paint in light coats and repeat the process, completing one side and then the other. Let this complete coat dry before applying the next one.


In Other NEWS